Positional Current Probe Technology
Current Probes and PCB Tracks or Ground Planes
Observation and measurement of current in PCB tracks has always presented major difficulties. The only practicable way of doing it has been to cut the track and insert either a current shunt, or a loop of wire large enough to attach a conventional closed-loop current probe. In modern high density circuit designs this is normally impracticable.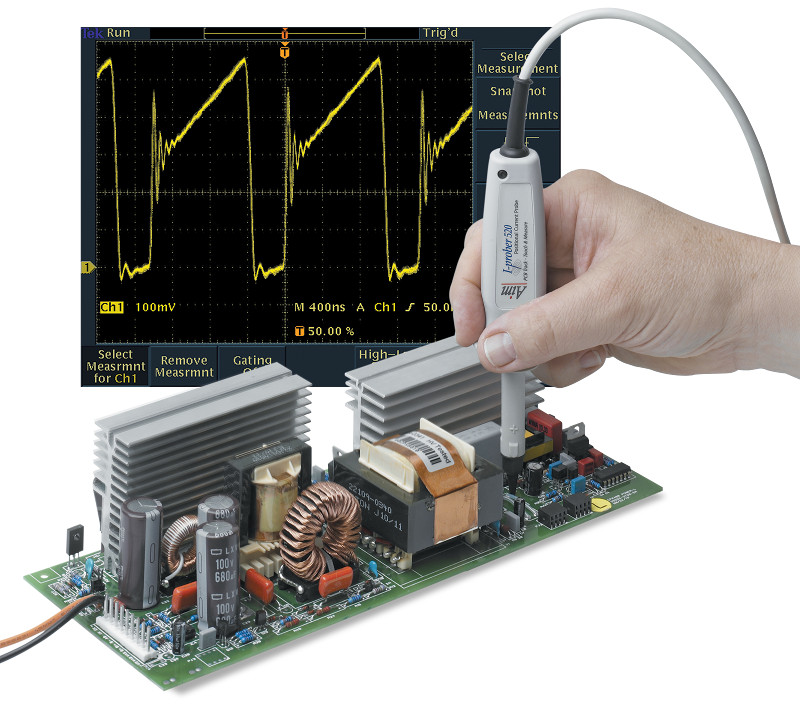
Aim-TTi has introduced a new type of probe which measures current by placing the insulated tip of the probe directly onto the PCB track without any need to cut it or to surround it by a magnetic loop. The Aim I-prober 520 has a bandwidth of DC to 5MHz and a dynamic range of 10mA to 20A.
Conventional current measurement techniques
True measurement of current requires the circuit to be broken and a current measurement device inserted (e.g. a shunt that converts current to voltage).Conventional dc capable current probes do not measure current, they measure field density. Current flowing through a conductor creates an H field which is directly proportional to the current. If a conductor is surrounded by a closed magnetic circuit the whole of the field is ‘captured’ by the magnetic circuit and the field density can be scaled to represent current.
Conventional current probes achieve this by concentrating the field into a gap within a loop of high Mu material. The field is then measured by a field sensor inserted into the gap, often a Hall effect device. Alternatively ac current can be measured by transformer action whereby the loop of magnetic material creates a one turn primary from the conductor that is enclosed. Hybrid devices use a field sensor for dc and low frequencies plus a transformer for higher frequencies.
Normally the probe provides a method of mechanically splitting the magnetic circuit to enable the conductor to be inserted. The position of the conductor within the loop has relatively little effect upon the measurement, and a high rejection of external fields can be achieved.
Measuring current in a PCB track presents particular difficulties because it is normally not possible either to break the track or to enclose it within a magnetic circuit. Typically engineers have to guess at the current flowing in a track from voltage measurements made in other parts of the circuit.
As electronic design moves towards ever higher densities, development omits the “bread board” stage and goes straight to PCB design. The inability to observe and measure currents in a circuit under development can pose a serious problem for engineers.
The principle of a “positional” current probe
To make a quantitative measurement of current from the field that it generates requires that a known proportion of that field is measured. As explained earlier, conventional current probes achieve this by concentrating the whole of the field within a loop of high Mu material, and measuring using transformer action or a field sensor within a gap.By contrast, the positional current probe, measures a known proportion of the field by positioning the sensor at a known distance from the conductor. This provides the potential to provide a calibrated measurement of current. However, to be usable with a PCB track, the size of the sensor must be very small as must its distance from the conductor.
Previous positional current probes have been physically large, capable only of measuring high currents at low bandwidth, and totally unsuited to use in the high densities of modern electronic circuits.
The technology behind the Aim I-prober 520
The I-prober 520 uses the long established principle of a fluxgate magnetometer to measure field. This type of magnetometer uses a magnetically susceptible core surrounded by a coil carrying an ac excitation current which magnetizes the core alternately in opposite directions. If there is no external magnetic field, this magnetization is symmetrical. When an external field is applied, the resulting asymmetry is detected by a feedback loop which applies an opposing current through the coil to restore the net field to zero. The output voltage is proportional to this opposing current, and therefore to the magnitude of the field.Conventional fluxgate magnetometers are relatively large with bandwidths of a few kHz. They are typically used for precision measurement of fields within geophysics and bio-electromagnetics.
By contrast, the sensor within the I-prober 520 uses a patented miniature fluxgate magnetometer of sub-millimetre size incorporating a highly advanced core material. This enables it to use an excitation frequency of several tens of MHz resulting in a sensor with a bandwidth of dc to 5MHz combined with low noise and wide dynamic range.
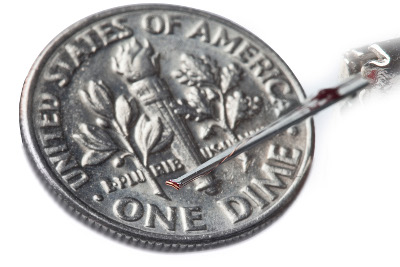
I-prober sensor tip coil with a dime for scale (a dime is 17.9mm diameter)
In consequence, the Aim I-prober 520 is the first and only probe that can be used to measure currents from amps down to milliamps at frequencies from dc up to 5MHz, making practical measurement of PCB track currents a reality.
The I-prober 520 in use
The magnitude of the signal from a positional current probe is critically related to its position relative to the conductor. The size of the conductor (e.g. the width of a PCB track) also has a significant effect.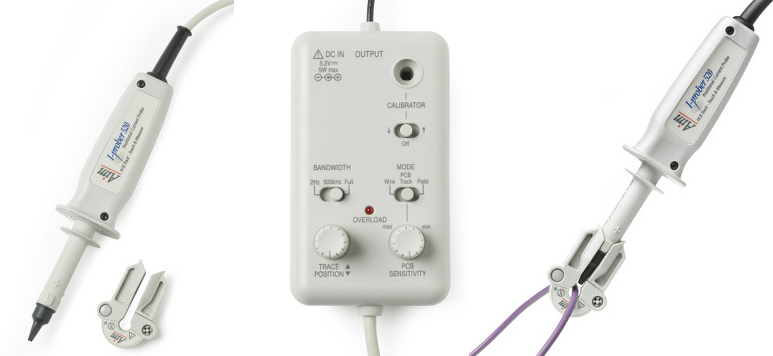
I-prober, its control box, and measuring with clip-on toroid assembly
This means that the sensitivity of the I-prober has to be adjusted to match the track width when quantitative measurements are required. A calibrator within the control box enables sensitivity adjustment in conjunction with a calibration graph. The output from the control box is scaled to 1 volt per amp and is intended for connection to a conventional oscilloscope.
The measurement result will also include other field effects present at the tip of the probe and not just that coming from the current through the conductor. This may include DC effects from adjacent magnetized components and from the earth's magnetic field, plus AC effects from transformers and other field radiating sources. Current in adjacent tracks, or tracks on the opposite side of the PCB will also affect the measurement.
There are potential solutions to these problems. The unwanted DC can be nulled out by observing the measurement without power to the circuit, whilst AC interference can be attenuated using bandwidth filters. The I-prober control box includes a wide range DC offset control and switchable filters.
Nevertheless, the use of the I-prober 520 requires interpretation based upon a proper understanding of circuits and systems, and is a tool for the professional engineer.
A useful analogy might be with an ultrasound probe. Whereas the layman will just see a blur of indeterminate images, the skilled professional can use it to make valuable qualitative and quantitative measurements. Similarly the experienced user of the Aim I-prober 520 can learn the techniques needed to distinguish the wanted from the unwanted and make observations and measurements that were previously impossible.
Current Probe Applications
The probe bandwidth of DC to 5MHz encompasses a wide range of applications including most power switching circuits. The maximum current that can be measured is 20A pk-pk in a track of up to 3.5mm, or 40A pk-pk in a wider track. The minimum visible current is limited by the noise figure which, for a 0.5mm track, is equivalent to around 6mA rms at full bandwidth reducing to 1.5mA at lower bandwidths. In practice this enables ac signals as low as 10mA pk-pk to be usefully observed.It should be understood, however, that accurate measurement of very small dc currents is likely to be impracticable in most situations. The effect of the earth's magnetic field is equivalent to up to 180mA flowing through a 0.5mm track. Whereas this can be nulled out within the control box, the effects of small changes in orientation can cause variations that would invalidate mA level measurements.
Similarly the effect of magnetized components and high Mu materials close to the probe can cause significant offsets. One of the most interesting applications of the I-prober is the observation of currents flowing within ground planes. Whereas quantitative measurements are not possible (because the current density can not be inferred) it is easy to see whether and where circulating currents are flowing and to find their injection points. Many circuit designs are adversely affected by power and ground connection schemes which fail to provide a true zero impedance connection allowing unexpected interfering signals to appear.
Further measurement modes
Whereas the primary purpose of the I-prober 520 is as a positional current probe, the are many circumstances where current measurements can be made in the conventional way by enclosing the conductor.To increase its overall usefulness, the I-prober 520 is supplied with a clip-on toroid assembly which converts it into a closed magnetic circuit probe for measuring current in a wire. The toroid is open until the probe is attached, allowing insertion of the wire without disconnection.
The wide bandwidth, dynamic range and low noise of the probe are retained but higher accuracy, repeatability and unwanted field rejection are achieved.
The very small size of the field sensor within the I-prober 520 gives it some unique capabilities when used to measure magnetic fields. A switch on the control box re-scales the output voltage to measure in Teslas or in amps per metre.
The variation of field with position can be accurately determined enabling the precise source of fields to be located and their variation in space measured.
Find out more at the I-prober product page at www.aimtti.com
Take the I-prober 520 product tour where you can find detailed description, technical specifications and explanatory videos
Watch a YouTube teardown at EEVblog